Digital Photography and Imaging | Task 7 & Task 8
Wong Jia Yi Carmen 0357198
Bachelor Of Design (Honours) In Creative Media
Lectures
WEEK 7: DOUBLE EXPOSURE
fig 1.0. Lecture Slides Week 7
From this lecture slide, I understood...
Double Exposing & Image Blending Mode
- Double Exposure Photography is a technique in photography that involves merging multiple images. The purpose of using double exposure photography is to create images that have a surreal, emotional, or humorous quality. These images typically feature silhouettes, suggesting that the merging of images often involves creating a silhouette effect in the final photograph.
- The double exposure effect might appear complicated or challenging. It is possible to create the double exposure effect both "in-camera" and using Adobe Photoshop, indicating that there are different methods to achieve this effect. It does not necessarily need a specialized "double exposure camera" to create this effect, as there are alternative approaches or tools available for creating double exposures.
- There are numerous creative opportunities or options available when it comes to editing photographs. Through editing, it is possible to change ordinary or unimpressive photographs into impressive and striking works of art or masterpieces. We have the ability to perform these transformations, indicating a sense of creative empowerment.
1. Using the Tilt-Shift Effect
~ Photoshop has a feature called "tilt-shift" that is described as great and is used to transform photos into soft works of art.
~ We can either blur only a part of the photo while keeping the rest in focus or blur everything in the image except for one specific detail. To access and use the tilt-shift feature in Photoshop, you need to follow these steps: Go to Filter > Blur Gallery > Tilt-Shift.

fig 1.1. Example Of The Tilt-Shift Effect
2. Create Fake Reflection
~ There are various ways to create reflections in photography. It mentions one specific method, which is creating a double exposure using a separate window photo. This technique is used to add interesting textures to a multiple-exposure photograph. Additionally, a main subject surface with raindrops and bokeh may be elements used in the described photography technique.

fig 1.2. Example Of Fake Reflection
3. Experiment with Simple Portraits and Details Textured
~ Combining or juxtaposing something plain (simple) with something complicated (complex or intricate) will result in a balanced outcome. Mixing elements with different levels of complexity can lead to a more harmonious or interesting result.
~ A combination of plain and complicated elements is expected to create a visually or aesthetically pleasing effect. This approach can have a practical benefit. It will save a lot of simple photos that you might discard.
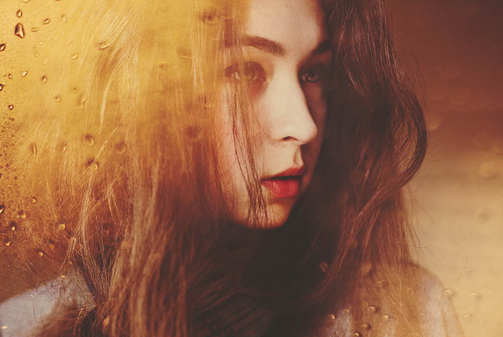
fig 1.3. Example Of Simple Portrait and Details Textured
4. Convert your results to Black & White
~ Not using colour in double-exposure images can make the emotions in the images more intense or impactful. Try using a lack of colour if we want to convey our work in a more vulnerable or emotionally charged manner. Using a lack of colour also adds a unique depth to the images, implying that it creates a distinctive visual effect.
~ Working with monochromatic or black-and-white images in double-exposure photography is an interesting and creative technique akin to the way film photography provides unique opportunities for experimentation.

fig 1.4. Example Of Black & White
5. Work with Silhouette
~ A technique in which two different images are combined in a single frame to create a unique and artistic effect. Many double exposure photographers choose to work with silhouettes.
3. Working with Silhouettes: The sentence asks, "But what if you worked with silhouettes only?" This suggests the idea of focusing exclusively on silhouettes in your double exposure photography.
~ Working with silhouettes exclusively is described as a "fun and doable challenge" that can provide an opportunity to showcase your creative skills. It implies that this approach can lead to innovative and artistic results.
~ Silhouettes of various subjects, including yourself, other people, or random objects, are mentioned as potential options. The sentence suggests that almost anything that catches your eye can be used to create unique composite images when working with silhouettes in double exposure photography.

fig 1.5. Example Of Silhouette
6. Pick 2 Random Photo
~ A random process does not necessarily lack meaning. It suggests that even if the results are obtained through chance or unpredictability, they can still carry significance or value. The results of this random process might lead to a story of their own. These results could be meaningful and have the potential to inspire or encourage others.
~ Some of the best double exposure photographs were not planned but rather the result of unintentional events. These unintentional double exposures, despite being unexpected, resulted in great feedback and contributed to significant creative growth. This implies that embracing serendipity in photography can lead to positive outcomes.
~ That creativity can be enhanced by letting go of preconceived ideas and exploring new and unexpected avenues in photography.

fig 1.5. Example Of 2 Random Campus
7. Make simple objects look fascinating
~ Take pictures of common or everyday objects that are often overlooked or considered uninteresting. The goal is to approach these objects with a fresh perspective and try to make them look like something else, possibly something more visually appealing or imaginative.
~ A plain and unremarkable building, when photographed in a certain way, could be made to resemble the outline of a starry sky. This implies that the photographer should experiment with lighting, angles, and other creative techniques to transform the mundane into something extraordinary.

fig 1.6. Example Of Simple Objects that look Fascinating
8. Use Shadow
~ Outlines are described as fantastic for double-exposure photography, indicating that they can be creatively employed in this photographic technique. Shadows are as effective as silhouettes in this genre, and they can also be used creatively for artistic purposes.
~Be creative with outlines and turn them into something beautiful, we have artistic freedom when working with these elements.

fig 1.7. Example Of Using Shadow In A Picture
Photoshop: Blend Modes
~ Working with blend modes is described as an experimental process, suggesting that it involves a degree of trial and error. It is difficult to predict the outcomes of using blend modes. The word "impossible" implies a high level of unpredictability. As a result of this unpredictability, the process often requires experimentation with various blend modes and Fill Opacities.
~ The goal of this experimentation is to achieve specific results that the person is looking for, indicating that blend modes are used in creative or graphic design contexts where visual outcomes are important.

fig 1.8. Blend Mode
Instructions
fig 1.0 DPI Module Information
Tutorial
Photo Editing and Composition
- Double Exposure Exercise (Google Slide Below)
fig 1.0 Double Exposure Tutorial Google Slides
Practical
PROJECT 2 (40%)
Timeframe: WEEK 4 - WEEK 9
PROJECT 2A: DOUBLE EXPOSURE (10%)
- Exercise 1: Double Exposure ( Follow Tutorial)
- Exercise 2: Your own version Double Exposure portrait
Timeframe: WEEK 4 - WEEK 9
PROJECT 2A: DOUBLE EXPOSURE (10%)
- Exercise 1: Double Exposure ( Follow Tutorial)
- Exercise 2: Your own version Double Exposure portrait
Today we learned about double exposure. After Mr Fauzi briefed us about it during our online class, we watched a tutorial video about the process and the pictures were provided in Google Drive.

fig 1.0 Double Exposure Process
And this is my Final Work.

fig 1.1 Final Work Double Exposure
After we have to do this process again with our own picture. We have to find the elements on the internet by ourselves and so I found some pictures on Google and this is what I've found.
This is the first picture, I wanna use this as the background.

fig 1.2 Background

fig 1.3 Pink Clouds

fig 1.4 Pine Trees
After collecting all the pictures from Google I started to play around with the filters and the composition for the double exposure of myself.

fig 1.5 Process Of Double Exposure (Myself Edition)
And this is my final work.

fig 1.6 Double Exposure (Myself Edition)
Reflection
Double exposure is an art form in photography that involves merging two or more images to create a single, harmonious composition. It demands a unique blend of technical prowess and artistic vision, as well as a keen understanding of storytelling through imagery.
One of the most enlightening aspects of this week's lessons was discovering how the juxtaposition of two or more images can convey complex narratives, emotions, or concepts. The combination of elements can create a surreal or dreamlike quality, inviting viewers to interpret the image in their own unique ways. This creative flexibility excites me and has kindled my imagination.
Understanding the technical process of creating a double exposure, such as adjusting exposure settings and aligning elements, was a valuable part of this week's learning. The precision required to merge multiple images seamlessly is a skill I aim to refine, as it plays a pivotal role in achieving a successful double exposure.
Experimentation was a crucial element in this week's lessons. Trying out different combinations of images and practicing the art of layering was both exciting and challenging. It demonstrated the importance of trial and error in the creative process and reminded me that mistakes can often lead to innovative and unexpected results.


Comments
Post a Comment