Digital Photography and Imaging | Task 4
Wong Jia Yi Carmen 0357198
Bachelor Of Design (Honours) In Creative Media
Lectures
WEEK 4: INTRODUCTION TO PHOTOSHOP 3 - ADJUSTMENT LAYER & FILTERS
fig 1.0. Lecture Slides Week 4
From this lecture slide, I understood...
What is Adjustment Layer?
- Adjustment Layers are a group of tools in Adobe Photoshop. They are described as "super useful" for non-destructive image editing. Non-destructive editing means you can make changes to an image without permanently altering the original pixels, making it easier to revert or modify adjustments later. It also allows you to add colour and tonal adjustments to your image. This could involve changing the brightness, contrast, saturation, hue, and other aspects of the image's appearance.
- Adjustment Layers offer flexibility in editing by allowing you to edit, discard, or restore adjustments at any time. This flexibility is highlighted as making your workflow in Photoshop more efficient.
Basic Understanding Of Adjustment Layer
- When adding an adjustment layer to an image, a new layer will be created on top of the original image and there is a Properties panel associated with the adjustment layer, and this panel is specific to the type of adjustment that you have selected. The purpose of the Properties panel is to allow you to make modifications to the adjustment layer.

fig 1.1. Process Of Adjustment Layers
1. Brightness / Contrast
~ Refers to a feature or tool that allows you to make adjustments to the tonal range of an image. Tonal range refers to the distribution of tones in an image, including highlights and shadows.
~The "brightness slider" is used to adjust the highlights in the image. This means you can make the bright areas of the image lighter or darker using this slider.
~ The "contrast slider" is used to adjust the shadows in the image. This slider allows you to increase or decrease the difference in brightness between the dark and light areas of the image.

fig 1.2. Process Of Brightness / Contrast
2. Level
~ Is a tool or feature used to modify the tonal values in an image. It accomplishes this by adjusting the levels of the shadows, mid-tones, and highlights within the image. Its commonly used and found in the adjustment layer panel of some image editing software. Level can significantly improve or correct the quality of an image as well

fig 1.3. Process Of Level
3. Curves
~ It allows the user to make adjustments to various points in an image. These adjustments can be made across the entire tonal range of the image. Tonal range typically refers to the full spectrum of tones, including highlights, mid-tones, and shadows. Is described as the most powerful and precise tool for editing the tones in an image. This implies that it is a highly effective and versatile tool for fine-tuning the appearance of an image by manipulating its tonal values.

fig 1.4. Process Of Curves
4. Exposure
~ Allows you to adjust exposure levels in an image using three sliders: "Exposure," "Offset," and "Gamma. 'Exposure' is used to adjust the highlights of the image. This implies that it can control the brightness of the brightest parts of the image. 'Offset' is used to adjust the mid-tones of the image. Mid-tones are typically the areas in the image that are neither very bright nor very dark. Furthermore, 'Gamma' is used to adjust the dark tones of the image. This means it can control the brightness of the darker areas in the image.

fig 1.5. Process Of Exposure
5. Selective Colours
~ Has the ability to "selectively modify" the intensity or quantity of a specific primary colour in an image. When you use the Selective Color adjustment layer, it allows you to change one primary colour without affecting the other primary colours in the image. This selective modification is a key feature of the tool.
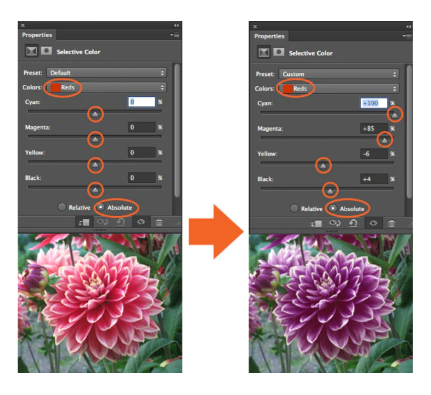
fig 1.6. Process Of Selective Colour
Filters
~ Filters serve various purposes, such as changing colours, adding blur, or creating new image effects. Adobe Photoshop offers a wide range of filters, providing a virtually unlimited variety for editing photos in various ways.

Tutorial
Match Lighting, Adjustment layers and Filters.
1. Adobe Photoshop Pen Tool (Videos Demo Below)
fig 1.0 How To Remove Background In Adobe Photoshop YouTube Video
fig 1.1 How To Add Adjustment To A Single Layer In Adobe Photoshop YouTube Video
fig 1.2 Fixing Skin Tomes In Adobe Photoshop YouTube Video
Practical
Taking our previous digital collage last week that got approved by Mr Fauzi, we were to play around with the layers and adjustment section in Photoshop.

fig 1.0. First Draft Of My Layers and Adjustment

fig 1.1. Second Draft Of My Layers and Adjustment
Reflection
It has been a pivotal point in my learning journey, as we delved into the intricate world of layers and adjustments in digital photography. This week's focus on post-processing techniques has opened up a realm of creative possibilities that I'm eager to explore further.
The concept of layers was central to this week's learning, and it has fundamentally transformed my approach to editing digital images. Understanding how to work with different layers allows for precise and non-destructive editing, enabling me to experiment freely with adjustments while preserving the original image. The ability to fine-tune various aspects of a photo, such as exposure, colour, and contrast, on separate layers provides a level of control that I hadn't fully appreciated before.
In addition to layers, this week introduced me to various adjustment tools and techniques. I gained knowledge with tools like levels, curves, and colour balance. Learning how to make subtle adjustments to correct exposure, eliminate colour casts, or boost contrast has made a noticeable difference in the quality of my images.


Comments
Post a Comment